Working with SCCM, WSUS and other SQL DB driven applications, it seems like every once in a while you find that the database has grown out of control. Whenever this happens, obviously we have to quickly determine why it is so big, which means that we have to figure out what part of the database is growing and eating up all of that space. The sp_spaceused stored procedure is an easy and quick way to get database and database object sizes.
To get the database size, we can simply execute:
exec sp_spaceused
This tells us how big the database is, and breaks it down into data, reserved space, index size, and unused space. As sweet as that is, at this point we already know that the db is big, but we need to figure out why. Again, we can use the sp_spaceused stored procedure to check specific tables that we know may be problematic. For instance, if your WSUS SUSDB database is out of control, you could check the size of the tbEventInstance table by firing off:
exec sp_spaceused 'tbEventInstance'
This is great if you have a pretty good idea about which table is causing problems or if your dealing with a database that only has a couple of tables, but in systems like SCCM or WSUS, there could be any number of tables causing the problem. Executing that command against each table would take far too long. We can, however, use the sp_msForEachTable stored procedure to execute it against all tables at once:
exec sp_msForEachTable 'exec sp_spaceused [?]'
This gets us the size of each table, which is what we want. The problem is that we get a different result for each execution, that looks something like this:
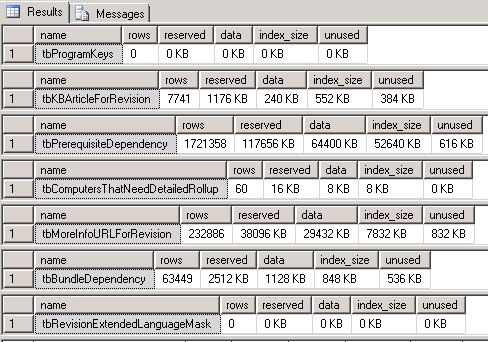
This is a good start, because now we just have to scan the list, but we can't sort this, so its still a manual process of looking through all of the output to find the problem. In a system like SCCM with a massive number of tables, this could still take a very long time.
From here we can solve that problem by adding some SQL to create a temp table, dump the results of the command into that table, and then display the sorted contents of that table.
declare @tablesize table (
[name] nvarchar(256),
[rows] varchar(18),
reserved varchar(18),
data varchar(18),
index_size varchar(18),
unused varchar(18)
)
insert @tablesize exec sp_msForEachTable 'exec sp_spaceused [?]'
select * from @tablesize order by data desc
Now we have exactly what we want, with the largest tables right at the top!
This is much improved, but if we wanted to take it a step further, we could actually use PowerShell to run this query on a regular schedule and alert us if a table grows over a certain threshold. PowerShell makes it easy to grab the results of our exec sp_msForEachTable 'exec sp_spaceused [?]' and put it into a data set.
$SQLQuery = "exec sp_msForEachTable 'exec sp_spaceused [?]'"
$Conn = New-Object System.Data.SqlClient.SqlConnection
$Conn.ConnectionString = "Server = mydbserver; Database = MyDB; Integrated Security = True"
$SqlCmd = New-Object System.Data.SqlClient.SqlCommand
$SqlCmd.CommandText = $SqlQuery
$SqlCmd.Connection = $Conn
$SqlAdapter = New-Object System.Data.SqlClient.SqlDataAdapter
$SqlAdapter.SelectCommand = $SqlCmd
$DataSet = New-Object System.Data.DataSet
[void]$SqlAdapter.Fill($DataSet)
$Conn.Close()
$DataSet.Tables
Now you can loop through the $DataSer.Tables, check for a desired threshold, and execute actions if certain conditions are met. Then you will not only know that the database is growing rapidly before anyone notices, but you'll have the offending table identified so that you can go right to work on solving the problem. That certainly beats wasting time trying to identify the problem after people are complaining about application performance!
Showing posts with label SCCM. Show all posts
Tuesday, June 26, 2012
Wednesday, May 30, 2012
Secure DoD Drive Wiping with SCCM
I mentioned in my last post a need to do a secure drive wipe on remote systems. There are several good and free options for wiping drives, but not many that can be executed remotely. Microsoft however offers a nice tool called SDelete as part of their free Sysinternals Suite. SDelete will do a DoD 5220.22-M sanitization of free space on a drive, but by itself isn't very good at destroying all of the data on a disk. That is where WinPE comes in. Using WinPE and sdelete is something that Derek Meier has blogged about previously. We're going to take this a step further and use SCCM to make this process remotely executable. Plus, we'll use a package to deliver the files to WinPE, so there is no need to modify the boot.wim or do any custom WinPE builds.
We'll basically use an SCCM Task Sequences to boot into Windows PE and format the drive with a single, empty C: partition. Then we'll use sdelete to handle the DoD wipe of the empty partition.
To do this, we'll need to get SDelete to Windows PE. So to start, we'll create a package with SDelete.exe (which can be downloaded from here: http://technet.microsoft.com/en-us/sysinternals/bb897443.aspx).
We'll also create a file called sdelete.reg with the following contents:
----------------- begin sdelete.reg -----------------
Windows Registry Editor Version 5.00
[HKEY_CURRENT_USER\Software\Sysinternals\SDelete]
"EulaAccepted"=dword:00000001
----------------- end sdelete.reg -----------------
Once the package with these two files is created, we can now move to our task sequence.
Note: These steps only apply for systems with a single hard drive. If you have multiple hard drives, you'll need to to repeat steps 3 and 4 for each disk in the system.
Step 1: Add a task to Restart into WinPE using your favorite boot.wim.
Step 2: We're going to copy over the files from our sdelete package. To do this, add a General -> Run Command Line task. Check the box by Package and select the package created with the sdelete files in it. The command line the I use whenever I'm copying files from a package to WinPE is:
xcopy.exe ".\*.*" "%WinDir%" /E /C /Q /H /R /Y /I
Step 3: Now that the files are in place, we'll add another Run Command Line task, which we'll use to accept the Systernals EULA for sdelete.exe. This time our command line will be:
We'll basically use an SCCM Task Sequences to boot into Windows PE and format the drive with a single, empty C: partition. Then we'll use sdelete to handle the DoD wipe of the empty partition.
To do this, we'll need to get SDelete to Windows PE. So to start, we'll create a package with SDelete.exe (which can be downloaded from here: http://technet.microsoft.com/en-us/sysinternals/bb897443.aspx).
We'll also create a file called sdelete.reg with the following contents:
----------------- begin sdelete.reg -----------------
Windows Registry Editor Version 5.00
[HKEY_CURRENT_USER\Software\Sysinternals\SDelete]
"EulaAccepted"=dword:00000001
----------------- end sdelete.reg -----------------
Once the package with these two files is created, we can now move to our task sequence.
Note: These steps only apply for systems with a single hard drive. If you have multiple hard drives, you'll need to to repeat steps 3 and 4 for each disk in the system.
Step 1: Add a task to Restart into WinPE using your favorite boot.wim.
Step 2: We're going to copy over the files from our sdelete package. To do this, add a General -> Run Command Line task. Check the box by Package and select the package created with the sdelete files in it. The command line the I use whenever I'm copying files from a package to WinPE is:
xcopy.exe ".\*.*" "%WinDir%" /E /C /Q /H /R /Y /I
(Ignore the whole Enable Remote Control section in this image. If you want to learn about using VNC to connect to WinPE, see my previous post)
regedit /s sdelete.reg
Set the Start in field to %WinDir%, since that is where we copied the files.
Step 4: Now we'll create on big C partition to fill the entire drive. Add a Disks -> Format and Partition Disk task. Set Disk number to 0 and Disk type to Standard(MBR). Create a new Volume. Set the Partition type to Primary and set it to use 100% of the free space. The File system should be NTFS and I recommend checking the Quick Format box (the seven pass 0/1 fill takes long enough).
Step 5: Now that we have one big, empty C: partition, its time to use sdelete to make sure that the old data is unrecoverable. For this we'll go back to a Run Command Line task. Our command will be:
sdelete.exe -p 7 -c -z
The -p 7 gives us seven passes. The -c tells it to clean free space. The -z tells it to zero free space.
Its important to set the Start in to C:\, otherwise you might try and clean the X: drive.
Now you're ready to go destroy some data! Just advertise your task sequence and watch it go to work making information unrecoverable. I think it goes without saying, but you should be very careful about where this is advertised, especially if you're using mandatory assignments.
Monday, May 28, 2012
Remote Control During SCCM OSD (Without Modifying the Boot.wim)
I recently had a discussion with my good friend and SCCM guru, Michael Orr, about remote controlling WinPE during the SCCM OSD process. He added Tight VNC to his boot.wim so that he could remote in and see what is happening if problems started popping up during OSD.
I recently took on a project to do a remote DoD wipe of computer harddrives, and decided to try and tackle it with SCCM OSD and Microsoft's sdelete (more on that later). Since the computers are going to be in multiple sites, all of which are remote to me, I decided that remote control could be very beneficial. Instead of trying to modify the boot.wim, I decided to add it on the fly with a package. Here's what I did.
First, we'll need the latest UltraVNC binaries (I'm using 1.0.9.6), which can be accessed here: http://www.uvnc.com/downloads/ultravnc/100-download-ultravnc-10962.html. Make sure that you grab the Binaries, and not the MSI or other installers. The binary zip file should include three files:
- winvnc.exe
- vncviewer.exe
- SCHook.dll
If you're not familiar with UltraVNC, the vncviewer.exe is what we'll use later to initiate the remote control session, so you can just set it aside for now.
Go ahead and run winvnc.exe, which will open the configuration window for the UltraVNC server. Make sure that Display Query Window is unchecked and that you have set a password.
Hit OK, and you should now have a winvnc.ini file with these settings in it.
Now open the ini file and find the line for path, and change it to path=x:\windows.
Save your new ini file and then create a new package within SCCM that contains it, winvnc.exe and schook.dll. I called my package UltraVNC 1.0.9.6 (WinPE). There isn't a need to create any programs because we're going to grab the files from a task sequence (and don't forget to push it out to your distribution points).
Now we're ready to tweak our OSD task sequence to allow VNC remote control.
Edit the task sequence, and right after the step where you Restart into Windows PE, we're going to add some commands. I put mine in a group called UltraVNC, but to each your own.
All of these entries are going to be Run Command Line entries (Add -> General -> Run Command Line).
First, we're going to disable the Windows firewall by using the Command Line:
wpeutil DisableFirewall
Next we're going to copy the UltraVNC files into WinPE. To do this, our Command Line will be:
xcopy.exe ".\*.*" "%WinDir%" /E /C /Q /H /R /Y /I
Check the box by Package, and select the package where you put the UltraVNC binaries.
This will take all of the files from that package and copy them into the X:\Windows\System32 directory.
Now we'll kick off the UltraVNC server by using the following command:
cmd.exe /c start %windir%\winvnc.exe
Its important that we use the cmd.exe /c start, because if we just called winvnc.exe directly, the task sequence would halt while it waited for winvnc.exe to close.
Now your UltraVNC server is running, so you can launch your vncviewer.exe and put in the IP address of your remote client!
As a final note, remote control won't really do you much good if you don't know the IP address where you want to connect. Typically with OSD, when a computer reboots into WinPE it retains the same IP address that it had previously, so a simple nslookup can typically give you that if you don't already know it. Another good suggestion is to do what my buddy Mike does and to use BGInfo within WinPE to stamp the IP address on the screen. That will allow remote users who call in to easily provide you an IP address.
Subscribe to:
Posts (Atom)